Contents
- 1 Excel TRANSPOSE Function
- 2 When to Use the Excel TRANSPOSE Function in Excel
- 3 What Excel TRANSPOSE Function Returns
- 4 Syntax of Excel TRANSPOSE Function
- 5 Input Arguments
- 6 Examples of the Excel TRANSPOSE Function
- 7 Choosing Between TRANSPOSE Function and TRANSPOSE (Paste Special)
- 8 Practice Workbook
- 9 Conclusion
- 10 Frequently Asked Questions (FAQs)
Excel TRANSPOSE Function

When to Use the Excel TRANSPOSE Function in Excel
The TRANSPOSE function1 in Excel is a powerful tool used to change the orientation of a range of cells. It comes in handy when you need to switch rows to columns or vice versa. This function is particularly useful when working with data sets that require a different layout for analysis, reporting, or presentation purposes.
What Excel TRANSPOSE Function Returns
The Excel TRANSPOSE function returns a transposed range of cells, flipping the rows and columns of the specified data. It allows you to reorganize your data efficiently without manual copy-pasting or complex formulas.
Syntax of Excel TRANSPOSE Function
The syntax of the Excel TRANSPOSE function is as follows:
=TRANSPOSE(array)
Input Arguments
The Excel TRANSPOSE function has only one argument
● array: The range of cells or an array that you want to transpose. It can be a reference to a cell range, a range name, or an array constant.
Examples of the Excel TRANSPOSE Function
Here are few examples of using the Excel TRANSPOSE function in Excel:
Example 1: Basic Usage
Suppose you have data in the range A3:D6, and you want to switch the rows to columns or vice versa. In cell F3, input the following formula:
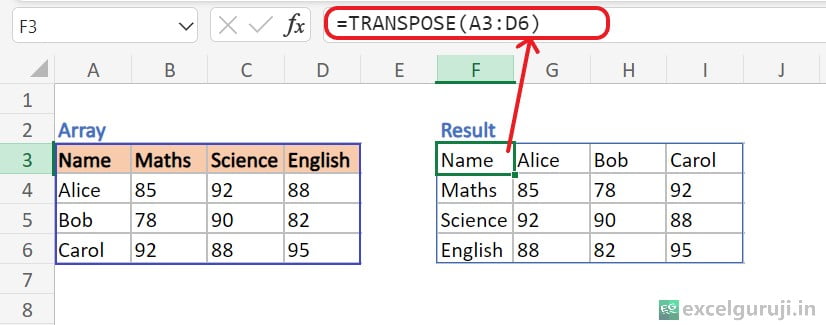
But, if you are using pre-dynamic array versions of Excel (Excel 2019 and earlier) and apply the formula described in the above example, you will encounter a #VALUE! error because they do not support array constants.
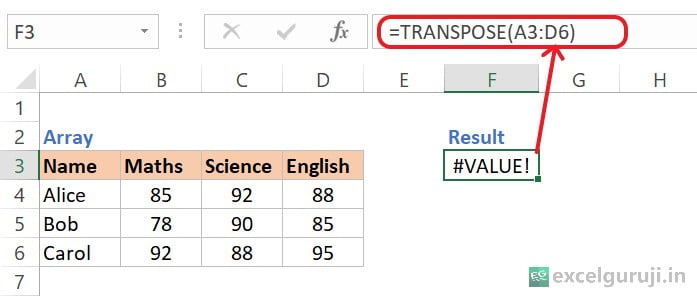
Now What?, you will find the solution in Example No. 2
Example 2: How to Use TRANSPOSE Function in Excel 2019 and Earlier Versions
First, count how many columns and rows are in the data you want to transpose
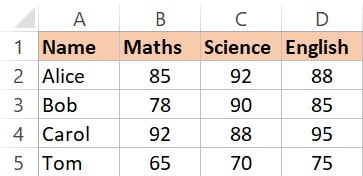
So, the data we want to TRANSPOSE has 4 columns and 5 rows.
Now, select some empty cells and make sure there are as many rows as the original table has columns and as many columns as the original table has rows.

Here, we select the same number of cells but they will be rotated from horizontal orientation to vertical, or vice versa.
After choosing some empty cells, type in the Transpose formula: =TRANSPOSE(A1:D5)
But wait, don’t press Enter just yet! Your Excel Transpose formula should look something similar like this:

To finish your formula correctly, press Ctrl + Shift + Enter.
After you press Ctrl + Shift + Enter, Excel will add {curly braces} around your Transpose formula. You will see them in the formula bar. Don’t try to type these braces yourself, it won’t work.
Look at the picture below. It shows that our original table has been successfully Transposed, turning 4 columns into 4 rows and 5 rows into 5 columns.

Example 3: TRANSPOSE With Paste Special
The TRANSPOSE feature, also available in Paste Special, provides a non-formula approach to transpose data. Here is how to use this feature.
- First, select the table you want to transpose and copy it. Then,
- Right-click on the cell where you want to transpose the data and choose ‘Paste Special‘ or you can also use keyboard shortcut Ctrl + Alt + V
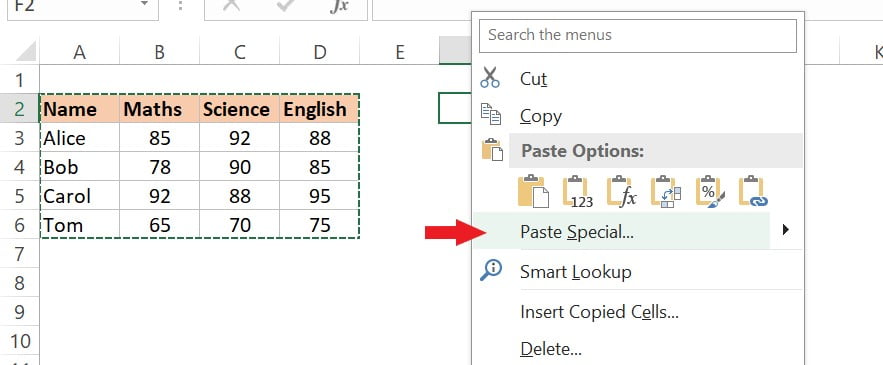
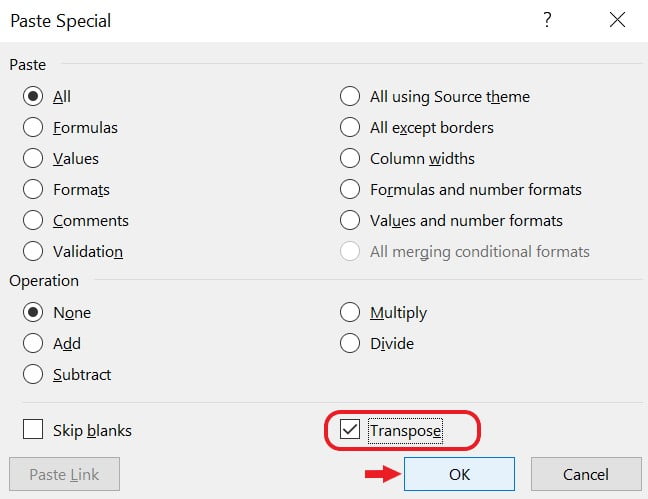
- Now, the Paste Special dialog box will open.
- Select ‘TRANSPOSE’ check box and click ‘OK.
So, now you can see that the copied part has been transposed successfully

Choosing Between TRANSPOSE Function and TRANSPOSE (Paste Special)
Now, you have two options available: one is the TRANSPOSE function, and the other is the TRANSPOSE Paste Special. You can choose the option that suits your requirements.
Dynamic Link vs. Static Data:
- Use the TRANSPOSE function when you want a dynamic link between the original and transposed data.
- Choose TRANSPOSE (Paste Special) when you need a one-time transformation and want the transposed data to be static.
Formula vs. Copy-Paste:
- Use the TRANSPOSE function for a formula-based, dynamic transformation.
- Choose TRANSPOSE (Paste Special) for a quick, non-formula, static rearrangement.
Practice Workbook
Download Free Practice WorkbookConclusion
In conclusion, the Excel TRANSPOSE function is a valuable tool for quickly reorganizing your data, providing a more convenient way to analyze and present information. Whether you are dealing with small or large datasets, the TRANSPOSE function can save you time and effort by eliminating the need for manual rearrangement.
Experiment with the TRANSPOSE function in different scenarios to become proficient in its usage. As with any Excel function, practice is key to mastering its capabilities. Start incorporating the TRANSPOSE function into your projects today and enhance your data manipulation skills in Excel!
Frequently Asked Questions (FAQs)
Q1: Can the TRANSPOSE function be used with non-contiguous ranges?
A1: No, the TRANSPOSE function works best with contiguous ranges.
Q2: Does the TRANSPOSE function alter the original data?
A2: No, the TRANSPOSE function creates a transposed copy of the original data without modifying the original range.
Q3: Can the TRANSPOSE function be used with arrays created by formulas?
A3: Yes, the TRANSPOSE function can work with arrays generated by formulas, provided the resulting array is within the allowed limits.
Q4: What happens if the input range has different numbers of rows and columns?
A4: The TRANSPOSE function will not work correctly with ranges that do not have an equal number of rows and columns.
Q5: Are there any limitations to the size of the range that TRANSPOSE can handle?
A5: The size of the input range is limited by Excel’s overall size constraints, but for practical purposes, the TRANSPOSE function is suitable for a wide range of datasets.
Other Related Excel Functions
Mastering Excel VLOOKUP Function: A Comprehensive Guide to Enhance Your Data Analysis Skills
Mastering Excel FILTER Function: A Comprehensive Guide for Data Filtering
Join me on Instagram, YouTube and WhatApp Channel for your daily dose of valuable tips and tricks! Catch insightful videos that will enhance your knowledge and skills. Don’t miss out – follow me now!
1 thought on “Effortless Data Rearrangement with Excel TRANSPOSE Function: A Quick Guide”