Contents
- 1 Excel TAKE Function
- 2 When to Use the Excel TAKE Function in Excel
- 3 What Excel TAKE Function Returns
- 4 Syntax of Excel TAKE Function
- 5 Input Arguments
- 6 Extra Notes
- 7 Examples of the Excel TAKE Function
- 7.1 Example 1: Extract Rows From the Start of an Array
- 7.2 Example 2: Extract Columns From the Start of an Array
- 7.3 Example 3: Extract Both Rows and Columns at the Same Time
- 7.4 Example 4: Extract Both Rows and Columns From the End of Array
- 7.5 Example 5: TAKE Function with Other Functions for Advanced Data Manipulation
- 8 Time to Apply What You have Learned.
- 9 Conclusion
- 10 Frequently Asked Questions (FAQs)
Excel TAKE Function
When to Use the Excel TAKE Function in Excel
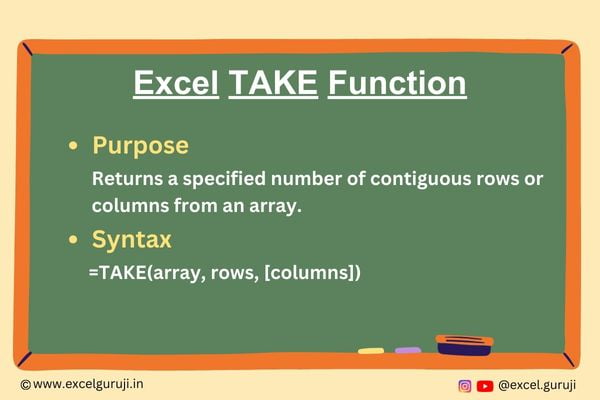
The TAKE function in Excel is a versatile tool designed to extract a specified number of contiguous rows or columns from the start or end of an array.
It can be employed in various data processing scenarios, allowing you to refine your data analysis and streamline your work.
What Excel TAKE Function Returns
The Excel TAKE function returns a portion of rows or columns from an array based on the specified parameters. The number of rows or columns to extract is determined by the rows and columns arguments.
Syntax of Excel TAKE Function
The syntax of the Excel TAKE function is as follows:
=TAKE(array, rows, [columns])
Input Arguments
Here are the input arguments for the Excel TAKE function:
● array: The array represents the source from which you want to extract rows or columns.
● rows: The rows parameter specifies the number of rows to take. A negative value extracts rows from the end of the array.
● columns: The columns parameter determines the number of columns to take. Similar to rows, a negative value extracts columns from the end of the array.
Extra Notes
● Excel TAKE function is exclusively accessible in Microsoft 365’s Excel and Excel for the web. To learn more about how to use Excel for Web for free. Watch 👇 this video
How to Get Microsoft Excel for Free | Free Microsoft Office | Microsoft Office 365
● Rows and columns argument are optional, but you must include at least one of them.
● If you set rows or columns to zero, TAKE function will give you all the rows and columns.
● If you specify more rows than the total number of rows in the data, TAKE function will result in an error (#VALUE!).
● Similarly, if you request more columns than there are in the data, TAKE function will also generate an error (#VALUE!).
Examples of the Excel TAKE Function
Let’s explore a few practical examples of the TAKE function in Excel:
Example 1: Extract Rows From the Start of an Array
Suppose you have a dataset, and you want to extract specific rows. You can do this using the following formula:
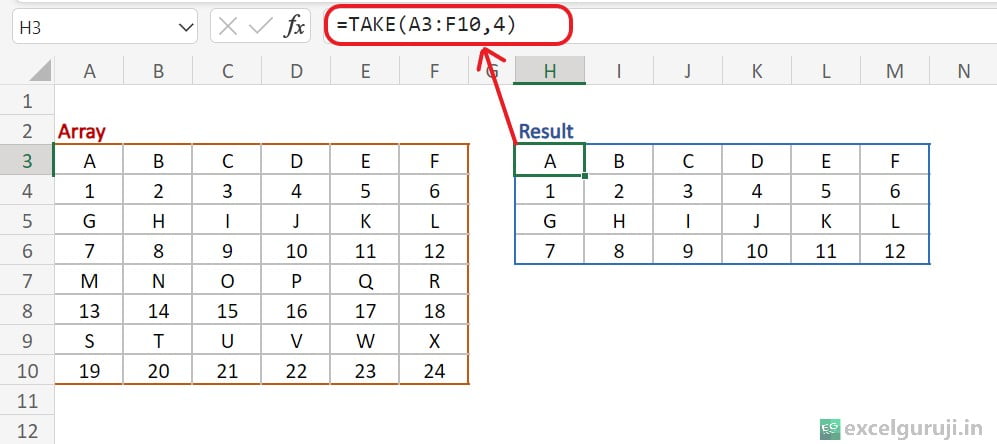
=TAKE(A3:F10,4)
- A3:F10: This is the array or range from which you want to extract rows.
- 4: These are the row numbers you want to extract from beginning of an array.
So, the result of this formula would be a new range that extract the first 4 rows from the original data range A3:F10.
Example 2: Extract Columns From the Start of an Array
Suppose you have a dataset, and you want to extract specific columns. You can do this using the following formula:
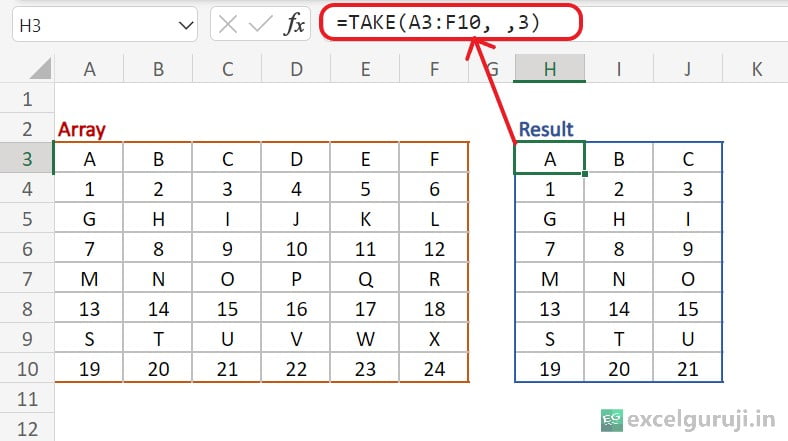
=TAKE(A3:F10, ,3)
- A3:F10: This is the array or range from which you want to extract columns.
- We omitted the rows argument in the formula
- 3: These are the column numbers you want to extract from beginning of an array.
So, the result of this formula would be a new range that extract the first 3 columns from the original data range A3:F10.
Example 3: Extract Both Rows and Columns at the Same Time
Suppose you have a dataset, and you want to extract rows and columns simultaneously. You can do this using the following formula:
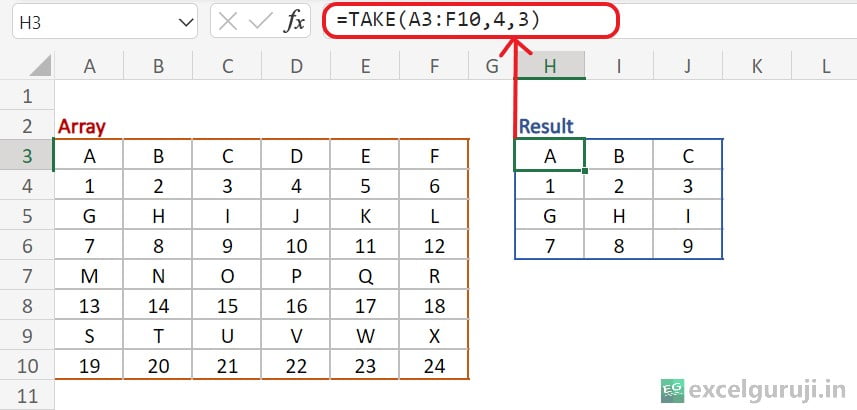
=TAKE(A3:F10,4,3)
- A3:F10: This is the array or range from which you want to extract rows and columns.
- 4: These are the row numbers you want to extract from beginning of an array.
- 3: These are the column numbers you want to extract from beginning of an array.
So, the result of this formula would be a new range that extract the first 4 rows and first 3 columns from the original data range A3:F10.
Example 4: Extract Both Rows and Columns From the End of Array
Suppose you have a dataset, and you want to extract rows and columns simultaneously at the end of the array. You can do this using the following formula:
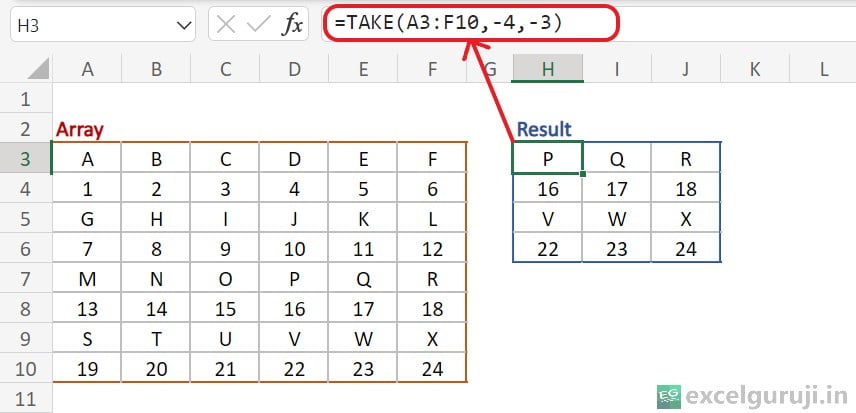
=TAKE(A3:F10,-4,-3)
- A3:F10: This is the array or range from which you want to extract rows and columns.
- –4: These are the row numbers you want to extract from the end of an array.
- –2: These are the column numbers you want to extract from the end of an array.
So, the result of this formula would be a new range that extract the last 4 rows and last 3 columns from the original data range A3:F10.
Example 5: TAKE Function with Other Functions for Advanced Data Manipulation
Imagine you have a dataset with student exam results in different subjects. Your goal is to analyze the data and extract the records of students who pass the exam.
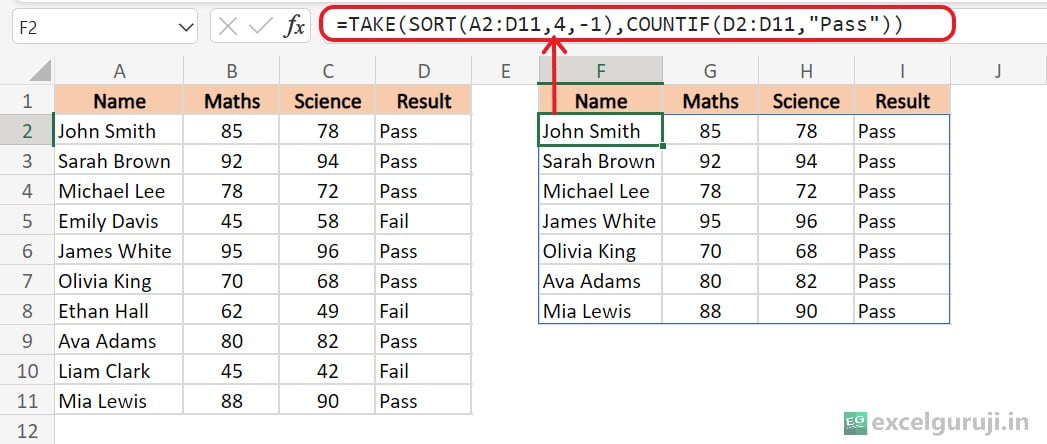
The formula =TAKE(SORT(A2:D11,4,-1),COUNTIF(D2:D11,”Pass”)) in Excel does the following:
- SORT(A2:D11, 4, -1): This part of the formula uses the SORT function. It sorts the data in the range A2:D11 based on the values in the 4th column (column D) in descending order (-1). So, it arranges the data in descending order based on the values in column D.
- COUNTIF(D2:D11, “Pass”): This part of the formula uses the COUNTIF function to count the number of cells in the range D2:D11 that contain the text “Pass”. It counts how many times “Pass” appears in column D.
- =TAKE(SORT(A2:D11, 4, -1), COUNTIF(D2:D11, “Pass”)): This is the main part of the formula. It takes the sorted data obtained in step 1 and uses the TAKE function. The TAKE function allows you to extract a specified number of rows from the beginning of an array. In this case, it extra the number of rows specified by the result of step 2, which is the count of “Pass” entries in column D.
The formula first sorts the data based on the values in column D in descending order and then extract the rows from the sorted array. This is a useful way to filter data, especially when you want to extract specific rows based on a certain condition, in this case, extract rows with “Pass” in column D.
Time to Apply What You have Learned.
Now, it is time to put the Excel TAKE function to the test. You can utilize the provided Excel file to experiment and witness how it operates. Inside the file, there are sample data and ready-made TAKE formulas to kickstart your practice.
If you have any questions or if you discover something interesting, please share your thoughts in the comments. Have fun learning by doing!
Conclusion
In conclusion, the Excel TAKE function is a valuable asset for refining your data analysis. Its ability to extract specific rows or columns from an array simplifies data processing tasks, making them more efficient and precise.
As with any Excel function, practice is key to mastering the TAKE function. Experiment with it in different scenarios to enhance your data analysis skills and improve your overall proficiency in Excel.
Excel functions, including TAKE, are powerful tools that can help you tackle complex data processing challenges with ease.
Frequently Asked Questions (FAQs)
Q1: Can the Excel TAKE function be used to exclude both rows and columns simultaneously?
A1: Yes, the TAKE function can be used to exclude both rows and columns at the same time. Simply provide the desired values for both the rows and columns arguments in the function.
Q2: What happens if you provide a non-numeric value for the rows or columns argument?
A2: The Excel TAKE function requires numeric values for the rows and columns arguments. If you provide a non-numeric value, it will result in a #NAME? error.
Q3: Is it possible to extract rows or columns from the end of an array using the TAKE function?
A3: Yes, the Excel TAKE function allows you to extract rows or columns from the end of the array by using negative values for the rows or columns argument.
Other Related Excel Functions
Excel CHOOSE Function: A Guide to Efficient Data Selection
Mastering Excel CHOOSECOLS Function: Custom Data Extraction and Analysis
Join me on Instagram, YouTube and WhatApp Channel for your daily dose of valuable tips and tricks! Catch insightful videos that will enhance your knowledge and skills. Don’t miss out – follow me now!