Contents
- 1 Excel DROP Function
- 2 When to Use the Excel DROP Function in Excel
- 3 What Excel DROP Function Returns
- 4 Syntax of Excel DROP Function
- 5 Input Arguments
- 6 Extra Notes
- 7 Examples of the Excel DROP Function
- 7.1 Example 1: Drop Rows From the Start of an Array
- 7.2 Example 2: Drop Columns From the Start of an Array
- 7.3 Example 3: Drop Both Rows and Columns at the Same Time
- 7.4 Example 4: Drop Both Rows and Columns From the End of Array
- 7.5 Example 5: DROP Function with Other Functions for Advanced Data Manipulation
- 8 Time to Apply What You have Learned.
- 9 Conclusion
- 10 Frequently Asked Questions (FAQs)
Excel DROP Function
When to Use the Excel DROP Function in Excel
You should consider using the Excel DROP function when you want to:
- Remove unnecessary header or footer rows or columns from a dataset.
- Filter out rows or columns based on certain criteria.
- The DROP function is versatile and can be applied in various scenarios to streamline your data manipulation tasks.
What Excel DROP Function Returns
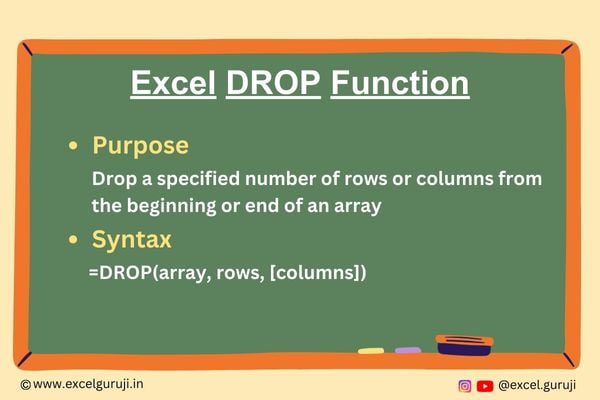
The Excel DROP function returns a modified array that excludes the specified number of rows or columns from the original array.
The result depends on the arguments you provide, including the array, the number of rows to drop, and the number of columns to exclude.
Syntax of Excel DROP Function
The syntax of the Excel DROP function is as follows:
=DROP(array, rows, [columns])
Input Arguments
Here are the input arguments for the Excel DROP function:
● array: The array from which you want to drop rows or columns. This can be a range of cells, a table, or any data structure in Excel.
● rows: The number of rows to drop. Use a negative value to drop rows from the end of the array.
● columns: The number of columns to exclude. A negative value excludes columns from the end of the array.
Extra Notes
● Excel DROP function is exclusively accessible in Microsoft 365’s Excel and Excel for the web. To learn more about how to use Excel for Web for free. Watch 👇 this video
How to Get Microsoft Excel for Free | Free Microsoft Office | Microsoft Office 365
● Rows and columns argument are optional, but you must include at least one of them.
● If you set rows or columns to zero, DROP function will give you all the rows and columns.
● If you specify more rows than the total number of rows in the data, DROP function will result in an error (#VALUE!).
● Similarly, if you request more columns than there are in the data, DROP function will also generate an error (#VALUE!).
Examples of the Excel DROP Function
Here are few examples of using the Excel DROP function in Excel:
Example 1: Drop Rows From the Start of an Array
Suppose you have a dataset, and you want to drop specific rows. You can do this using the following formula:
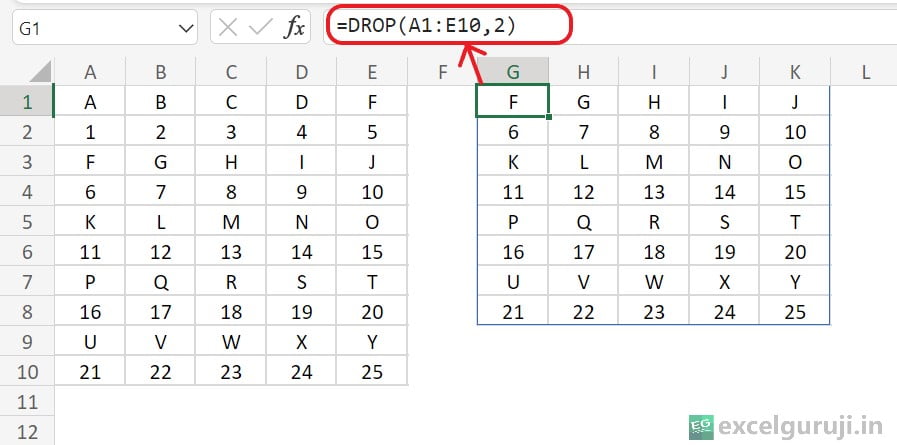
=DROP(A1:E10,2)
- A1:E10: This is the array or range from which you want to drop rows.
- 2: These are the row numbers you want to drop from beginning of an array.
So, the result of this formula would be a new range that drop the first 2 rows from the original data range A1:E10.
Example 2: Drop Columns From the Start of an Array
Suppose you have a dataset, and you want to drop specific columns. You can do this using the following formula:
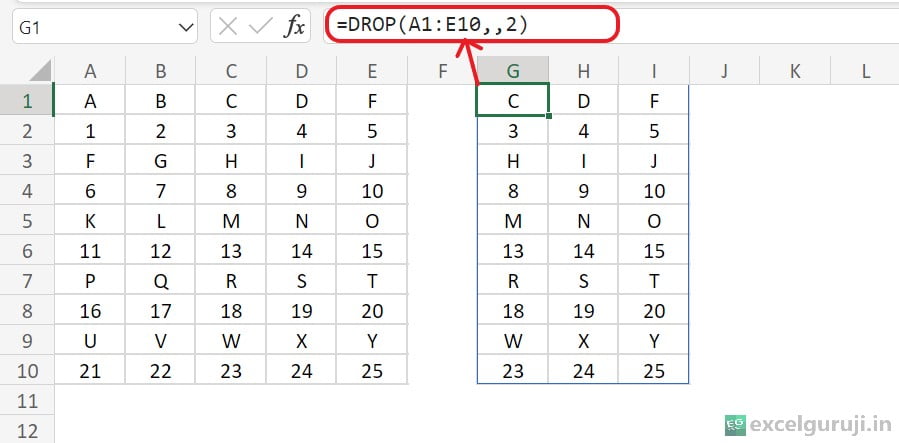
=DROP(A1:E10, ,2)
- A1:E10: This is the array or range from which you want to drop columns.
- We omitted the rows argument in the formula
- 2: These are the column numbers you want to drop from beginning of an array.
So, the result of this formula would be a new range that drop the first 2 columns from the original data range A1:E10.
Example 3: Drop Both Rows and Columns at the Same Time
Suppose you have a dataset, and you want to drop rows and columns simultaneously. You can do this using the following formula:
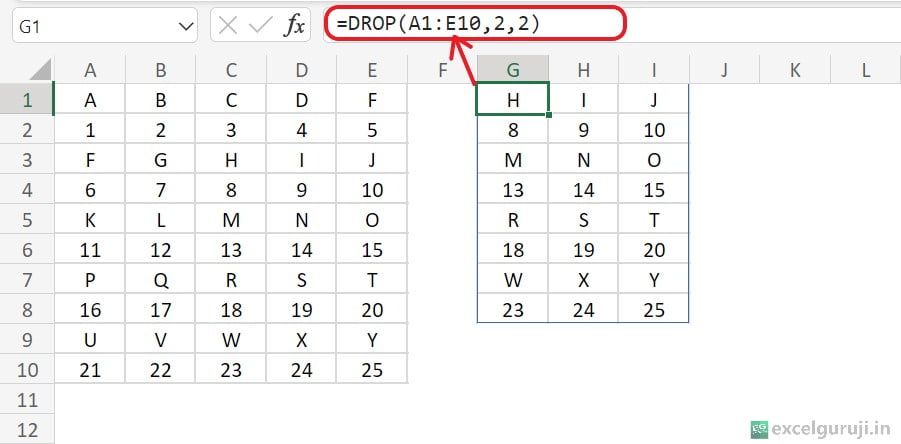
=DROP(A1:E10,2,2)
- A1:E10: This is the array or range from which you want to drop rows and column.
- 2: These are the row numbers you want to drop from beginning of an array.
- 2: These are the column numbers you want to drop from beginning of an array.
So, the result of this formula would be a new range that drop the first 2 rows and first 2 columns from the original data range A1:E10.
Example 4: Drop Both Rows and Columns From the End of Array
Suppose you have a dataset, and you want to drop rows and columns simultaneously at the end of the array. You can do this using the following formula:
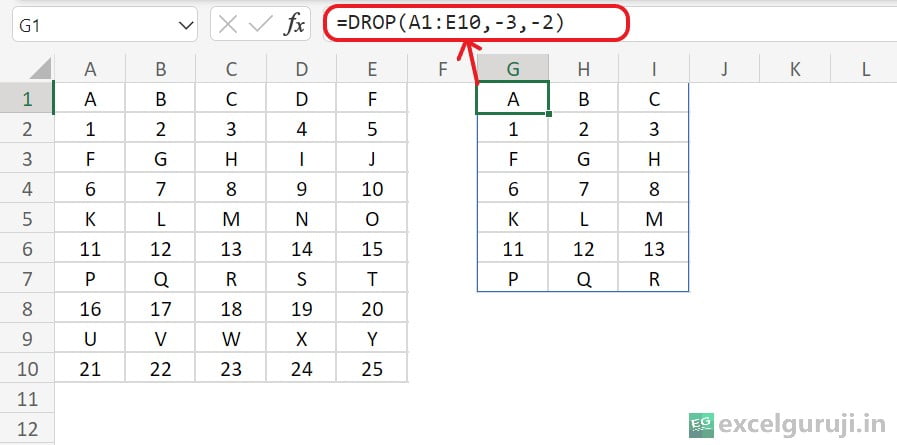
=DROP(A1:E10,-3,-2)
- A1:E10: This is the array or range from which you want to drop rows and columns.
- –3: These are the row numbers you want to drop from the end of an array.
- –2: These are the column numbers you want to drop from the end of an array.
So, the result of this formula would be a new range that drop the last 2 rows and last 2 columns from the original data range A1:E10.
Example 5: DROP Function with Other Functions for Advanced Data Manipulation
Imagine you have a dataset with student exam results in different subjects. Your goal is to analyze the data and exclude the records of students who failed the exam.
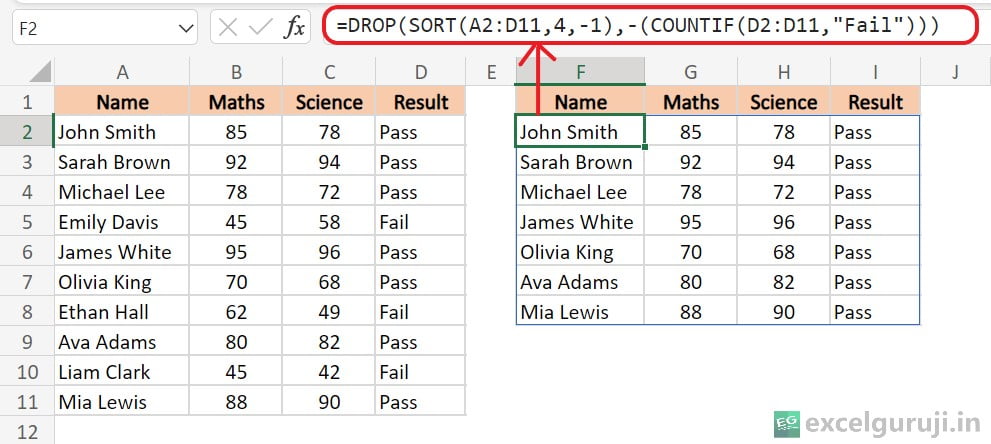
The formula =DROP(SORT(A2:D11,4,-1),-(COUNTIF(D2:D11,”Fail”))) in Excel does the following:
- SORT(A2:D11, 4, -1): This part of the formula uses the SORT function. It sorts the data in the range A2:D11 based on the values in the 4th column (column D) in descending order (-1). So, it arranges the data in descending order based on the values in column D.
- COUNTIF(D2:D11, “Fail”): This part of the formula uses the COUNTIF function to count the number of cells in the range D2:D11 that contain the text “Fail”. It counts how many times “Fail” appears in column D.
- -(COUNTIF(D2:D11, “Fail”)): Here, the negative sign is used to reverse the count obtained in the previous step. So, if there are 3 instances of “Fail” in column D, this part will yield -3.
- =DROP(SORT(A2:D11, 4, -1), -(COUNTIF(D2:D11, “Fail”))): This is the main part of the formula. It takes the sorted data obtained in step 1 and uses the DROP function. The DROP function removes a specified number of rows from the end of the array. In this case, it removes the number of rows specified by the result of step 3, which is -3.
The formula first sorts the data based on the values in column D in descending order and then drops the last 3 rows from the sorted array. This is a useful way to filter data, especially when you want to remove specific rows based on a certain condition, in this case, removing rows with “Fail” in column D.
Time to Apply What You have Learned.
Now, it is time to put the Excel DROP function to the test. You can utilize the provided Excel file to experiment and witness how it operates. Inside the file, there are sample data and ready-made DROP formulas to kickstart your practice.
If you have any questions or if you discover something interesting, please share your thoughts in the comments. Have fun learning by doing!
Conclusion
The Excel DROP function is a valuable addition to your Excel toolkit when it comes to managing and manipulating data.
Whether you need to clean up your datasets, exclude unnecessary information, or work with specific data subsets, the DROP function can help streamline your tasks and enhance your Excel proficiency.
Remember that mastering Excel functions takes practice, so don’t hesitate to experiment and explore different applications of the DROP function in your own projects. Start utilizing the DROP function today to take your Excel skills to the next level!
Frequently Asked Questions (FAQs)
Q1: Can the Excel DROP function be used to exclude both rows and columns simultaneously?
A1: Yes, the DROP function can be used to exclude both rows and columns at the same time. Simply provide the desired values for both the rows and columns arguments in the function.
Q2: What happens if you provide a non-numeric value for the rows or columns argument?
A2: The Excel DROP function requires numeric values for the rows and columns arguments. If you provide a non-numeric value, it will result in a #NAME? error.
Q3: Is there an alternative function for including rows and columns from the start or end of an array in Excel?
A3: The Excel DROP function is specifically designed for this purpose. If you want to include rows and columns, you would use the function in combination with other Excel functions, such as INDEX or OFFSET.
Other Related Excel Functions
Excel CHOOSE Function: A Guide to Efficient Data Selection
Mastering Excel CHOOSECOLS Function: Custom Data Extraction and Analysis
Join me on Instagram, YouTube and WhatApp Channel for your daily dose of valuable tips and tricks! Catch insightful videos that will enhance your knowledge and skills. Don’t miss out – follow me now!